How to Use an Ultrasonic Cleaner: Step-by-Step Guide
Read Time:8 Minute, 53 Second
Imagine pulling out your favorite watch or delicate jewelry after years of buildup, only to see it sparkle like new within minutes. That sense of satisfaction comes from a simple yet powerful tool: the ultrasonic cleaner. These machines use sound waves to reach deep into tiny crevices where brushes and rags cannot go. They deliver impressive results with little effort. If you own or plan to get one, learning the right way to use it makes all the difference. In this guide, you will discover everything from basic setup to advanced tips that help you clean safely and effectively. For high-quality options and expert support, check out the ultrasonic cleaner at UltraTecno on their site.
Studies show ultrasonic cleaning cuts blood contamination on dental tools by more than 100 times compared to hand washing alone. It also slashes virus levels by huge amounts in lab tests. These numbers prove why professionals across many fields rely on this method for deep, consistent cleaning.
What Is an Ultrasonic Cleaner and How Does It Work?
An ultrasonic cleaner is a tank-like device that holds a liquid solution and sends high-frequency sound waves through it. These waves create a process called cavitation. Tiny bubbles form, grow, and then collapse with strong force. This action acts like millions of microscopic scrub brushes that knock dirt loose from surfaces.
The sound waves operate at frequencies people cannot hear, usually between 20 and 200 kilohertz. Lower frequencies create bigger bubbles with more power for heavy dirt. Higher frequencies work better for delicate items because they produce smaller, gentler bubbles. The collapse of each bubble releases intense but short-lived energy. Local temperatures can spike high for a split second, yet the effect stays safe for the items because it happens on such a small scale.
This cleaning method reaches every nook and cranny. It works well on complex shapes like gears, hinges, or printed circuit boards. Unlike manual scrubbing, it cleans without abrasion, which reduces the chance of scratches or wear. Many users notice items come out cleaner than they ever could achieve with traditional methods.
Key Benefits of Ultrasonic Cleaning
- Deep cleaning power: It removes grease, carbon, rust, and residues from hard-to-reach spots.
- Time savings: Most cycles finish in just a few minutes to half an hour.
- Gentle on items: The process avoids harsh chemicals or heavy scrubbing in many cases.
- Versatile use: It handles metals, glass, ceramics, some plastics, and more.
- Improved safety: It cuts down on manual labor with sharp tools or strong solvents.
Professionals in jewelry repair, automotive shops, dental offices, and manufacturing plants all use these cleaners daily. Home users enjoy them for eyeglasses, watches, and household tools too.
Choosing the Right Ultrasonic Cleaner for Your Needs
Pick a model that matches the size and type of items you clean most often. Small benchtop units work great for jewelry and small parts. Larger industrial models suit bigger tools or batches of items.
Think about frequency first. A 40 kHz machine offers a good balance for general use. It cleans effectively without being too aggressive for most materials. For very delicate work, look for higher frequencies around 80 kHz or more. Some machines let you adjust power or have sweep modes that move the sound waves around for even cleaning.
Check the tank material. Stainless steel holds up best against solutions and constant use. Heaters help warm the liquid, which boosts cleaning power for oils and greases. Timers and digital controls make operation simple and repeatable.
Consider basket options too. A good basket keeps items off the tank bottom, which protects both the machine and your valuables. Some models include multiple baskets or racks for different jobs.
Prepare Your Ultrasonic Cleaner
Start with a clean workspace. Read the user manual for your specific model because small details can vary.
- Place the cleaner on a stable, level surface near a power outlet and sink for easy draining.
- Check that the tank is empty and free of any old residue.
- Fill the tank with warm water to the recommended level, usually about one inch from the top. Leave room for the items and solution.
- Add the proper cleaning solution according to the mix ratio. Gentle detergents work for many jobs. Specialized formulas target oils, rust, or carbon. Avoid strong acids or bases unless the manufacturer approves them.
- Plug in the unit and turn on the heater if your model has one. Let the solution warm up to around 40 to 60 degrees Celsius for best results.
- Run a short degassing cycle. This removes air bubbles from the fresh solution so cavitation works at full strength. Most machines need 5 to 10 minutes for this step.
Proper preparation sets you up for success. Skipping it often leads to weak cleaning or longer cycle times.
Step-by-Step Guide: How to Use an Ultrasonic Cleaner
Follow these steps for consistent, great results.
Step 1: Inspect and Prepare Your Items
Examine each piece for loose parts or damage. Disassemble anything you can to expose all surfaces. Remove big chunks of dirt with a quick wipe or rinse. This helps the ultrasonic action focus on stuck-on grime.
For items like carburetors or tools, take them apart as much as possible. Jewelry might need stones removed if they are loose or sensitive.
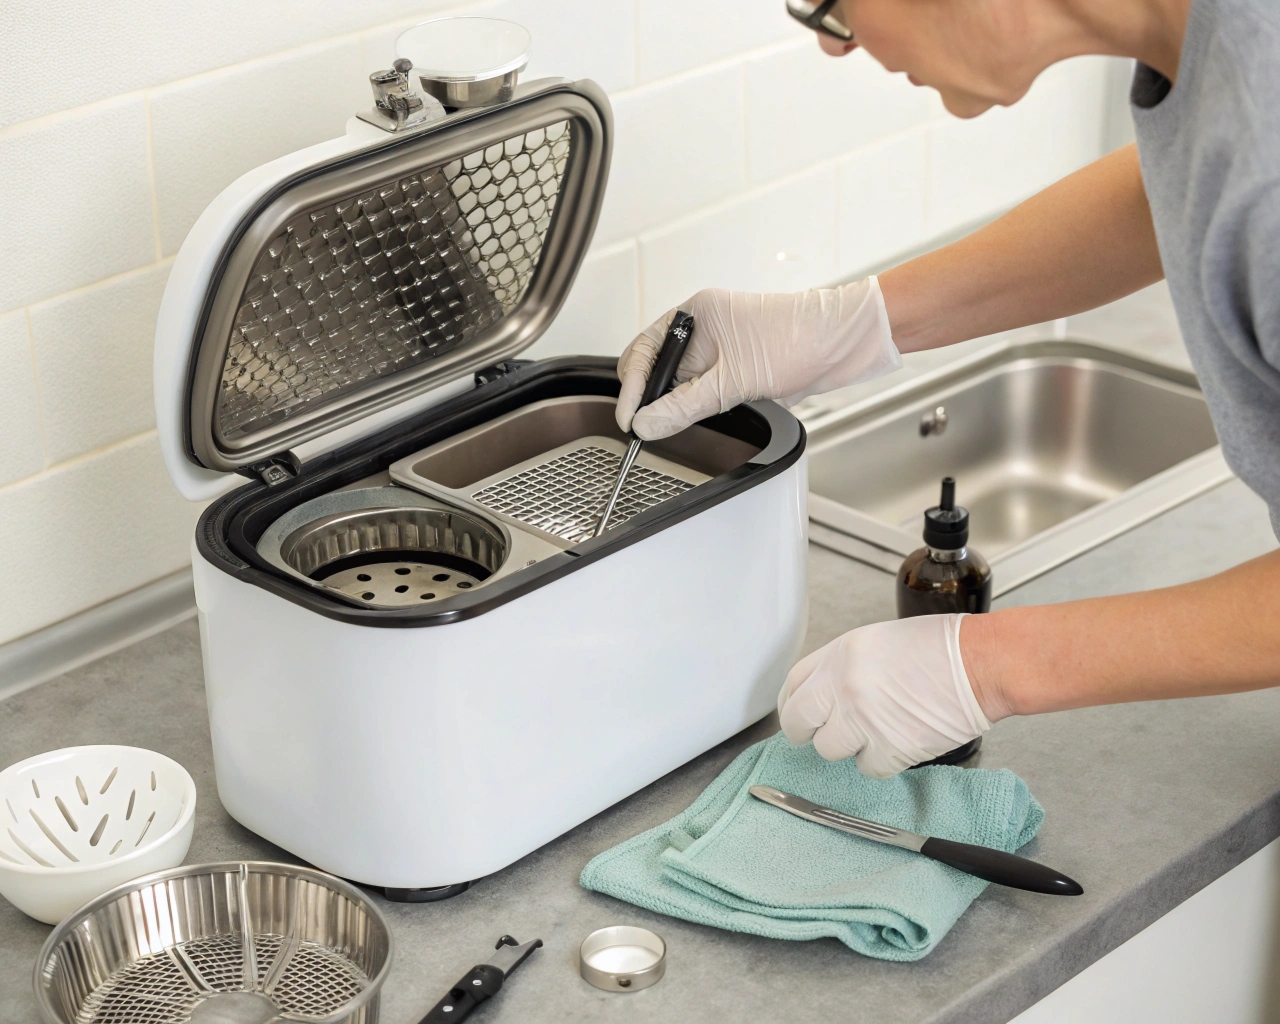
Step 2: Load Items Properly
Place items in a basket or use holders so they do not touch the tank bottom. Keep pieces separated so solution flows freely around them. Do not overcrowd the tank. Overloading blocks waves and leaves some areas uncleaned.
Suspend larger items if needed. Make sure everything stays fully submerged during the cycle.
Step 3: Set the Controls
Choose the right time, temperature, and power settings. Start with 5 to 10 minutes for light cleaning. Heavy jobs may need 20 to 30 minutes. Test short cycles first on valuable items.
Monitor temperature. A warm solution cleans better, but too much heat can damage some materials or evaporate the liquid.
Step 4: Run the Cleaning Cycle
Turn on the machine and let it work. You might hear a faint hum or see small bubbles. Avoid opening the lid often during the cycle because it disturbs the process.
Step 5: Rinse and Dry
Remove items carefully with tongs or gloves. Rinse them thoroughly under clean water or in a separate rinse tank to remove any remaining solution. Dry them right away with a soft cloth or air dryer to prevent spots or rust.
For extra shine on metal, you can add a quick polish step after drying.
Best Cleaning Solutions for Different Applications
The solution you choose matters as much as the machine itself. Plain water works for light dust, but additives make a big difference.
- Jewelry and watches: Use mild alkaline solutions or jewelry-specific formulas. They lift tarnish without harming gems or plating.
- Tools and mechanical parts: Degreasing solutions cut through oils and grease effectively.
- Medical and dental instruments: Enzymatic or neutral cleaners remove biological material safely.
- Electronics: Special low-residue formulas prevent damage to circuits.
- Carburetors and engine parts: Stronger solvents or multi-purpose cleaners tackle carbon buildup.
Always follow dilution instructions. Change the solution regularly, especially when it looks dirty or cloudy. Fresh solution cleans much better.
Safety Tips When Using an Ultrasonic Cleaner
Stay safe by following basic rules. Wear gloves and eye protection when handling solutions. Work in a well-ventilated area to avoid fumes.
Do not put your hands in the tank while it runs. The cavitation can irritate skin over time. Keep flammable solvents away from heat sources.
Listen for unusual noises that might signal problems. Unplug the unit before moving or cleaning it. Store chemicals properly and keep the area dry around the electrical parts.
For medical use, follow strict protocols to prevent cross-contamination. Ultrasonic cleaning boosts patient safety by removing more bioburden than manual methods.
Common Mistakes to Avoid
Many new users run into the same issues. Avoid these pitfalls for better performance.
- Overloading the tank: Too many items reduce cleaning power.
- Wrong solution: Harsh chemicals can damage the tank or items.
- Placing items on the bottom: This blocks cavitation and can scratch surfaces.
- Skipping degassing: Air in the solution weakens the bubble action.
- Not rinsing well: Leftover cleaner can cause spots or corrosion.
- Running empty or with low liquid: This damages the transducers.
Take time to learn your machine. Start with less important items until you feel confident.
Maintenance and Care for Long-Term Performance
Good care keeps your cleaner working like new for years.
Drain and rinse the tank after each use or at the end of the day. Wipe down the inside to remove sludge. Check for scale buildup and clean as needed.
Inspect the power cord and controls regularly. Some models have filters that need replacement. Run a cleaning cycle with a tank cleaner solution periodically.
Store the unit in a dry place when not in use. Cover it to keep dust out. Replace worn baskets or accessories to maintain good results.
Simple daily habits prevent big problems later.
Advanced Tips and Troubleshooting
For stubborn dirt, try heating the solution or running multiple short cycles instead of one long one. Change the solution between cycles for best effect.
If cleaning seems weak, check these common fixes:
- Make sure the solution level stays correct.
- Verify the temperature.
- Clean the tank thoroughly.
- Test with a piece of aluminum foil. Small holes or wrinkles in the foil show good cavitation.
For items that float, weigh them down gently with safe materials. Experiment with different frequencies if your machine allows it.
In industrial settings, people combine ultrasonic cleaning with other steps like rinsing stations or drying ovens for full workflows.
Applications Across Different Fields
Jewelry makers restore sparkle to pieces quickly. Mechanics clean carburetors and injectors without disassembly hassles. Dentists and doctors rely on ultrasonic cleaners to prepare instruments safely.
Hobbyists clean coins, model parts, and gun components. Electronics repair shops remove flux from boards. The possibilities keep growing as people discover new uses.
Conclusion
Mastering how to use an ultrasonic cleaner opens up a world of efficient, deep cleaning. You now know the science behind cavitation, the right setup steps, safety practices, and maintenance routines that deliver great results every time. Start simple, follow the process, and adjust based on your specific items.
Take action today. Set up your cleaner, gather some items that need attention, and run your first cycle. You will see the difference right away. With practice, you will handle tougher jobs and enjoy cleaner results with less work. Clean smarter and keep your valuable items in top shape for longer.
Average Rating