
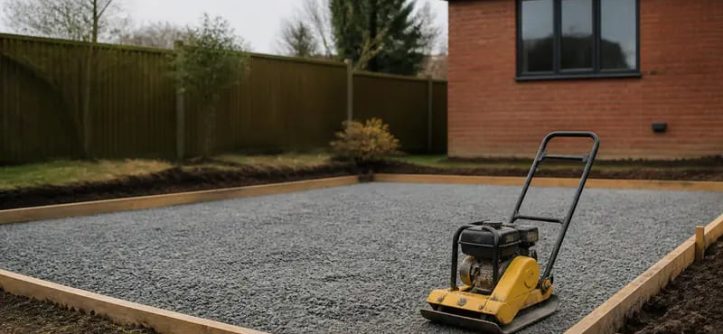
Good preparation is all about getting your site ready for the concrete lorry to arrive the next day.
Check Access for the Lorry
Reinforce your site information with details regarding access for the lorry, such as gate width, sharp turns, reverse maneuvers, overhead power lines and low lying branches. Also highlight any weak surfaces that the lorry may drive over such as shared drives and decking. Additionally specify any weight restrictions for these areas as a fully loaded concrete lorry can weigh up to 40 tons.
Compact the Sub-Base Properly
This is one of the simplest checks to ensure a proper foundation for your concrete slab. It simply requires you to dig down to the correct depth and fill with hardcore or MOT type 1 material. This then needs to be compacted down in layers using a plate compactor. If this is not done the slab could end up cracking or sinking in places.
Set Out Formwork and Check Levels
Ensure that all Formwork/Shuttering is set up and fixed securely before placing an order for any concrete. Check that all Formwork/Shuttering is level and that all corners are square. Use a straight edge or a laser level to achieve this and check at least 4 points on each board to ensure that the board is level. Small errors made at this stage could result in problems that become expensive to put right once the concrete has been placed.
Sort Out Drainage and Groundwater
Be aware of any standing water in the sub-base, as this can cause dilution of the concrete and affect the bonding. Also be aware of any water courses near the site and check the flood risk online through the government website. Should there be a high water table then a sump may need to be excavated and the water pumped out on the morning of the pour.
Position Reinforcement Correctly

It’s also very important to set out your Reinforcement correctly prior to concreting. Most Reinforcement is placed mid slab depth and must be securely fixed prior to placing the concrete to prevent it from being displaced in any way. The Reinforcement must not be laid on the ground and must not be higher than the top surface of the slab otherwise it will not be effective in preventing any cracking.
Protect What’s Nearby
Cover up things like fences, drains and finished surfaces near to the area of the pour to prevent splashes of concrete damaging them. Also plan where excess concrete and spoil from the pour will be placed. Remember a couple of hours of setting up dust sheets etc. before the pour will be far better than trying to scrub dried concrete off patio’s etc. after the event.
Have Tools and Hands Ready
With the site prepared, the tools you need to complete the pour should be on site. This could include wheelbarrows, a vibrating poker to aid in riddling air from the mix, tamping beams to aid in leveling off the pour and enough manpower to spread and finish the concrete in due course. In some instances a specific mix is required, for example Monster Mix for stronger and faster setting concrete, so check what you have ordered and that it is suitable for the job at hand.
Keep an Eye on the Weather
As with any construction job, a good concrete pour can be ruined by bad weather, but equally so by poor preparation before the pour. Heavy rain after a pour can lead to erosion and even weaken the fresh concrete. While concrete can tolerate some degree of frost, it must be allowed to cure properly before it is exposed to freezing temperatures. Cracks can occur if the concrete does freeze.
So do these steps well and the pour itself is usually a doddle. Getting the prep right before the concrete lorry arrives is hard work, but the reward is worth it.



Leave a Reply